Showing posts with label Review. Show all posts

Sunday, July 27, 2014

Review - Dainty Digits Polish

Hey loves! Hope is well and bright in your world! 

Today I have two colors from Dainty Digits Polish! The owner / create is Anetress. I have known her for a while through the indie polish world and she is a great person. A very kindred soul, wise, and extremely professional. When she talks you listen, and when she makes a joke you laugh hard. Just a wonderful person all around. 
I bought two of her polishes from her as I try to buy and support other indies that I am able to meet and have a connection with. 

The first color is "Planetary Pearl" a great mauve / dusty rose holo filled color. I loved it! Formula is great! I did three thin coats, but you can totally do two. I just can't leave well enough alone. 
Look at that holo just gleamin in this soft and sweet color! 

The second color I have is "No Way!" Another awesome color. This one is slightly more shear so three thin coats will get you where you need to be. This is such an interesting color. Is it grey? Kinda. Is it green? Kinda. Is it black? Kinda. I think you get the point. Just a really cool color period! 
Again with the holo!! Yes yes yes!! 

Please go check out Anetress! 
Instagram - @daintydigitspolish
Store - http://daintydigitspolish.storenvy.com 

She has a new collection coming out too!! Go support this great polish!! 


Sunday, July 20, 2014

Review - Born Pretty Store Water Decals

Hey nail lovies! What's shakin?

Born Pretty Store sent me a few things to review - 3 different water decals and some cute acrylic bows! 

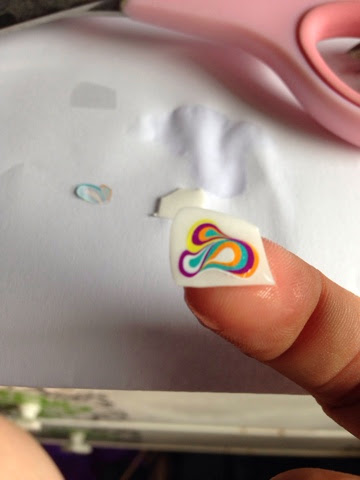
Today I am going to try one of the water decals - the cool bright psychedelic looking ones! I have never tried water decals before so bear with me friends! 
Here are the colors I chose (not picutred is white) 
I wanted to choose colors that are in the design as well as different enough to see if it made any difference to the decals once applied. I painted each nail a different color and waited for then to fully dry. This first time I am not applying a top coat to the colors before applying the decals. The next one I review I will apply before the decals. 
Ok side note my cuticles look like dry death but I am not done with the mani and I haven't oiled and moisturizer today! Don't judge - ok you can a little bit but the finished product will be soft and smooth 😃

So the instructions are pretty basic:
- Clean your fingernails and apply a base color, let base color dry
- Remove the protective film and cut out the desired pattern. 
- Put the pattern in water for 10-20 seconds 
- Moisten the fingernail and stick the pattern into position
- Sop up the extra water with a paper towel 
- Seal with top coat 

Ok here goes nothing! 
And I will say I did it wrong on the first go around! You are supposed to peel the backing off and then place the decal. This is not like a temporary tattoo.
I peeled off and it was white with the design face down! Oops! Here we are again. Onto the next nail! 
 Ok much better! They just slide right off the backing onto your finger and you can tweezers, or nippers or like I did an orange stick. 
The decals are very pliable, and easy to work with once they slide off the backing. You don't have to rush and as long as your base color is dry you can even move it around. Very cool! I went ahead and added some dots after the finished product. 

I really like the finished product. The base color doesn't matter to the decal whatsoever. That is definately nice because the color you see is going to be the color on the nail. This watermarble like pattern is super fun and there are additional designs in the paper so many more manis can be done. The directions lacked where you are supposed to take the back off yourself then place the decal. But once I figured out it was easy from there. They do not dry or garden up quickly while removing and placing on the nail with an orange stick which I also loved. It was nice to be able to manipulate it. If they aren't completely smoothed out over your nail or have slight wrinkles the top coat smooths that out.m evenly and quickly. I can't wait to try my other decals now! 

You can get these and many other products at www.bornprettystore.com and you can use code NNG10 for 10% off your order!! 
Check Out the Born Pretty Store now!


Sunday, July 13, 2014

Review - CDB Nail Lacquer

Happy Sunday dolls! You still staying cool? It still going to be 108 degrees today and the rest of the week! 

Today I have some swatches from CDB Lacquer and the lovely Cheyenne! She is such a gem! First, her nail art and swatches are to die for and like myself pulls double duty, does blogging / reviews and creates her own line as well she has swatched for me quite a few times and always does a fantastic job! 


She recently released the "Vivid Vixens" Collection and I am love with these colors. All bright, colorful and sparkly! I chose three of them to purchase and I now need them all! 

First up is "Spirited" this is my favorite of the bunch and is so versatile. This silver goes on so smooth and is so pretty! The first photo is three thin coats no undie. The second shows one coat over the purple which is China Glaze "Gothic Lolita". This is such a versatile color. I can't wait to put it over black, pink, blue any color really! But on it's own as well is to die for! 

The second color I have to share with you is "Attitude" a pretty and light colored sparkly teal. First photo is three thin coats. The second photo is over China Glaze "Turned Up Turquoise" again, the formula is soft and smooth. Not thick at all. I love this shade. I want to be on a beach wearing this color. And I want to try this over a black or darker blue as well. 

The third color from the collection I tried is "Fierce" a fun fiery red. Again first photo is thre thin coats and the second is over Orly "Retro Red" I love this color as well. It has the same great sparkle and same great formula as the others from this collection. This color is something I want to wear when I am out for an evening with my girls and enjoying a drink with an umbrella in it on some bar patio or a beach (but I can't get to a beach). 

For the Vivid Vixen Collection - I want them all! There is a green, orange and yellow that are awesome too! These colors are ao very versatile as you can see by my swatches and using them over like color hues. I can't wait to try them over something like black or darker hues. These colors and her formula are amazing! 

The next color I have is "Un-Birthday Party" a fun bubble gum pink with a bunc if fun and bright different shaped glitter. I seriously think this is such a fun polish. It is reminiscent of childhood to me. Just the way the pink and glitters work together. It's probably what the inside brain looked like at the age of 8! I did not have to dig for glitters or do a lot of rolling. I got glitter at every dip. This is not goopy and thick like some glitter bombs can be which I appreciated. That always make me shy away a bit but I had to have this color! 

CDB Lacquer is a great brand with great colors! I would recommend any if her colors. The Vivid Vixens rock and she has some awesome glitters too!! Check her out at her shop on Storenvy and her Instgram @cdblacquer


Wednesday, January 22, 2014

So Many Swatches!!!

Bonjour my loves! I have had so many wonderful customers and friends get my polish and the results have been no less than stellar! Look at these lovely swatches from Instagram! (Instagram names listed for credit)

Here is "Ace" by @MissLynnae 

Here are two swatches of "Birdie"
Top by: @cdbnails143
Bottom by: @beginnails


 Here is Cadence by @beginnails

Here is Emerson
Top: @beauty_by_kass
Bottom @marketeerwife with Phaedra (glitter Ombre'd)


 Here is Phaedra by @marketeerwife 


Tuesday, January 21, 2014

Gwen For OPI - OPI Review

YAY! I have been looking forward to this line ever since I heard it was being released. I still have not picked up all the colors but I am not sure if I want the deep red "I sing in color" and the glitter "In true Stefani fashion"
I was able to get my hands on the awesome crème pink "Hey Baby" and the two satins "Love.Angel.Music.Baby" and "4 In The Morning" I also picked up the super cool "Push and Shove"


I picked up "Love.Angel.Music.Baby" and "Push and Shove" in December before the actual release which was odd, at my local JCPenny salon. I had heard the release wasn't until January. I hadn't seen any of my Instagram friends with it yet and I knew it was going to be popular. Oops on JCP but yay me!

I really enjoyed "Love.Angel.Music.Baby" it is what OPI calls a satin finish and it tells you right on the cap do not add top coat. It reminds me of liquid sand but definitely with little to texture it is just smooth and matte. It is a pretty gold hue with a little sparkle. It goes on so easy, and I think because of the formula dries extremely fast. 


I also had to try "Push and Shove" right away. I wanted to see how metallic this would really be. I have been looking for a metallic nail polish on and off so I was really excited to see this. It comes with a special BASE coat. I did not apply a regular base coat to my nails and the one that came with it in fear I would mess up the formula somehow. I let that dry almost completely and then I applied the silver. It goes on streaky, and takes a few strokes to get it to look straight. If you have lots lines in your nails like I do it picks them all up. I wasn't sure if I was supposed to apply this differently but after two or three coats depending on how it went on I got this to look pretty even. I definitely wouldn't do a full mani again because of how it shows the imperfections in my nails (gasp!) I ended up using it again as an accent nail in a Seahawks mani that weekend though. I do really like the idea, and the product, you just need to have patience when applying


Last weekend I picked up "Hey Baby" and "4 In The Morning".
I am not the biggest of fans of pink and this one seemed extra pink. But I wanted to check it out, broaden my horizons, be flexible. This polish goes on so smooth and easy. And it really is a fun color. I got quite a few compliments on my mani when I was out running errands. It is a show stopper for sure.

"4 In The Morning" is the other satin in the collection. It is black in the bottle and when applied it goes on just as easy and smooth as "Love.Angel.Music.Baby". When dry it dries to almost a chalkboard look and has some very fine silver specks in it. Definitely a fun one as one. I used that as an accent nail with my "Hey Baby". I really love pink and black together.

I still want to get my hands on the special edition color with the nail art and Swarovski elements. If I get it I will also review that!

Enjoy! Go get you some Gwen for OPI!

Sunday, November 10, 2013

Review: Winstonia Store - Metallic Studs

I was awarded the opportunity to blog about and review for Winstobia Store and their metallic studs. There is also a 10% Off Coupon through December 31st for these studs, use NAILARTJENN as the coupon code. Thank you Winstonia Store!
 
I went on their store and was able to choose the size and style that I wanted to work with. 
I chose the 4mm rectangle and 3mm squares. I also got the squares in gold and silver and the rectangles in black and gold. So much fun! They came nicely packaged, in a perfect sized shipping envelope. Some places go a little overboard. 


My first manicure I did I wanted to show texture and have a ton of fun with the rectangular studs in gold. I used Sinful Colors new Crystal Crush colors in Purple Gleam and Treasure Chest. I wanted to create a fun pattern with these so on the purple nails I did a stair pattern, placing the studs vertically. On the teal nails I did a vertical and horizontal design to switch it up. 
Isn't this just so much fun!? The colors in the polish against the gold of the studs just makes it blend so well. 

My second manicure I did was for my NFL Gameday manicure for my Seahawks! I used the silver squares to show toughness, and strength. 

This worked perfectly for the look I wanted to attain. 

Most of you by looking at my Instagram will see I don't use a lot of "attachments" in my nail art and manicures. I never found a good glue, or a good stud that would stay on my finger, or one that didn't feel too heavy on my finger when trying to place it. These are a good width, and don't feel like my fingers are being weighed down. I did find 3 of the studs that were damaged out of the bags. 2 squares were warped on the corner and a rectangle was scraped. Out of the whole bag of studs I dismissed that. I can only imagine the number of studs they handle daily and how hard it would be to keep it all in check. I don't like putting them away and trying to pick them all up haha, you never know how many you may use. 


I have really enjoyed using these studs, and want the other shapes and sizes they have too!! 
Please go visit them online 
Here is the direct link to the studs: 
Remember to use NAILARTJENN for a 10% coupon code! Good through Dec. 31st.
 
I really do like these studs and will use them more!! 

Review: Revlon Parfumerie - Scented Nail Polish

Yesterday I decided to hit up my local Rite Aid for a drugstore nail polish haul. I saw an Instagram buddy review the scented Revlon polishes and was interested. I have never bought Revlon before and let's just say I may have fallen for the marketing ploy. Cute little perfume looking bottles and it smells good. Ok. I caved. I only bought 4 though, not the whole collection! Yay me, it is the small victories people. 
First I tried Bordeaux (one of my favorite types of red wines) this was a given. Wine is another huge passion of mine. I think that is why I lean towards reds and deep purples so much. I didn't know what to expect at first. I applied this pretty deep red wine color. I smelled my finger (kind of cracking up right now - imagining you all with a mental picture of me smelling my finger!) it smelled like nail polish still. I was like "WTF? I got bamboozled here!" Then I turn the bottle over a and in teeny tiny writing it says "fragranced when dry" ok got it. Haha! 
So this is two coats of Bordeaux. 
The scent is interesting. It is somewhat sweet. Not really overpowering. 

Next up is "Moonlit Woods"

This is three coats. This scent is so faint. It isn't sweet and isn't like you're smelling a tree either. But has a calm quality to it. 

Next is "Spun Sugar" 

This is 2 coats. I was really wanting this one to blow me away in the scent department. It didn't. This still had the most nail polish smell to me. Boo. 

Lastly, "Wintermint" 

This is 2 coats. Holy goodness in a bottle batman! This is like sweet, minty gum in a bottle! In love. I enjoy the awesome color, and the glitter, and almost textured look to it. 

All in all, for $5.99 a piece it was a good buy. Yes it's gimmicky, but that's why it's called marketing! I fell for it, haha. I enjoy the colors and I am glad I tried it. I may go back and get a few other colors. With or without the smells they are still good colors for a good price. 

Wednesday, October 30, 2013

Product Review - Orly Matte FX Flake Top Coat

Recently I reviewed the Orly FX Matte Polish and I really enjoyed the outcome, unfortunately the Flake Top Coat is not a great outcome for me. I am not sure if it was the base color that was wrong to try out or it is just the product.


I first chose a solid base color with no extra shine or shimmer - Orly "Harmonious Mess"


This is a color that I have had for a while now and not used yet. I thought this color would offset the flake topcoat well. Here is a swatch:


This is actually a really pretty color. It is grey / purple and looks really great against my skin tone. I don't know why I haven't used it before but it is probably because I just have so many polishes.
 
Now for the application of the Orly Matte FX Flake Topcoat. I applied 1 coat to my right and 2 coats on my left.
 
 
Top is Left and Bottom is Right
 
The lighting is not great I am sorry about that but I will post a pic at the end of this to show you better.
 
In my opinion, the top coat is not great. I like the concept of having that matte look with little multicolored flakes. It reminds me of ice on the ground with the little flecks of color.
 
This morning I woke up to look at my nails. They had a brown tinge to them. I am thinking it was the color I used as a base mixed with the "Green" Flake Topcoat but upon application the green really was clear almost. And my nails have bubbles in them.


Those black dots are bubbles, and are not part of the polish. Also the yellowish coloring of the flakes can also be seen. Again, the idea and concept is nice, but I am not sure about the product quality. I do however want to try this at least one more time on a different base color to see if that makes any difference in the outcome.